|
Adjusting The Mixture Screws |
|
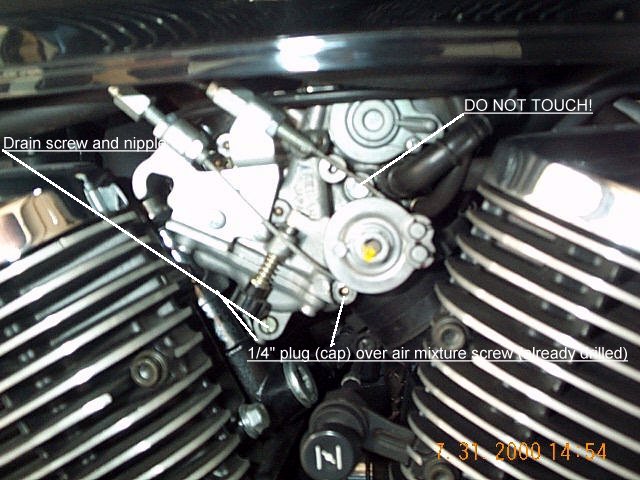
When making modifications to the stock exhaust such as punching or drilling holes, or after adding an aftermarket exhaust, it may become necessary to make some adjustments to the pilot jet (idle circuit) air mixture screws to eliminate the "Rice Krispies", the crackling and popping you get when decelerating. Here's how it's done. Oh, and by the way, just for RockRabbit, the left side screw is for the rear cylinder (see the cylinder intake port and the boot from the left carb running down onto it?), and the right side screw is for the front cylinder (look at the intake boot, same as the left side.). UPDATE! Please see the Exhaust Mods & Mixture Screw Update. ***If you have installed Stage 3 jetting and the larger Aero #42 slow jets, the factory 2 1/4 turns open is sufficient in most cases!*** |
Click on a thumbnail to enlarge.
|
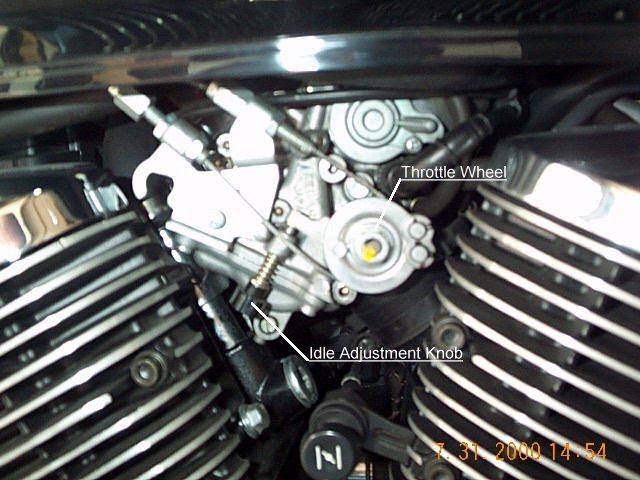
To get rid of that nasty popping on decel, you have to have more fuel at idle. I originally just raised my idle with the idle screw (the black knob on the left side of your carb in front of the throttle wheel that you cable run to from the throttle on the handlebar), until I could figure out where the air mixture screw was.
|
 |
|
On the left side of the carb where the throttle wheel is, right below it you will see a silver plug ( mine had a felt tip marker slash on it, that way they can tell if it's the original I guess) about 1/4" in diameter. Forward of it is a brass screw that is the drain screw for that carb. If you turn that screw counterclockwise to unscrew it, fuel will start dribbling out of the little nipple right below it. SO DON'T DO THAT, I'M JUST POINTING IT OUT. Anyway, I got a small drill bit, about 1/16" (I think), and carefully drilled a hole in the center of the plug. Don't push too hard or it will go through the plug and hit the screw behind it. Use just a little pressure. After drilling, get a sheet metal screw that has threads a little bigger than the hole you just drilled and start to screw it in the hole. When it gets tight, get a pair of pliers and grab hold of the screw (vice-grips would work good here) and carefully tug on the screw. Eventually the screw with the plug attached to it will pop out. Look into the hole the plug came out of.
|
 |
|
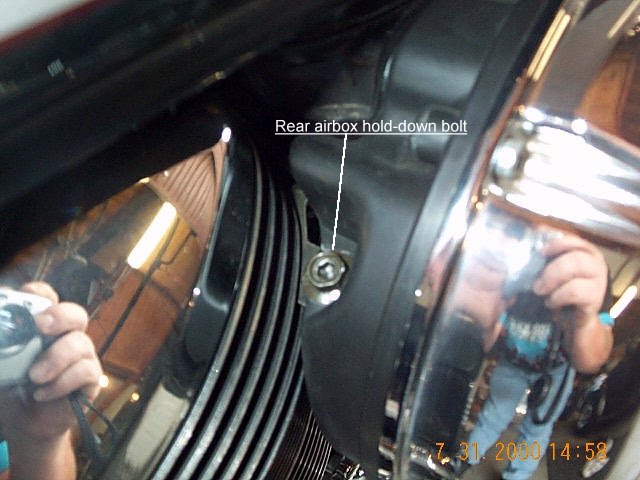
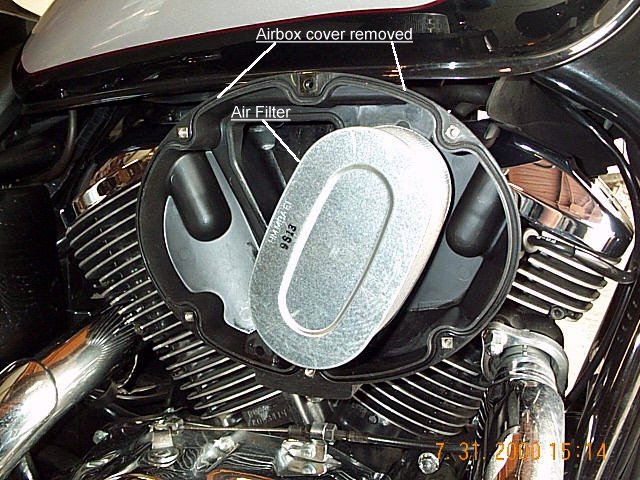
Repeat the steps above on the right side carb. To get to the right side carb, you will have to remove the air box. The air box comes off easy. Use the allen wrench in your bike's toolkit to remove the six screws that hold the airbox cover on. Pull the filter out.
|
 |
|
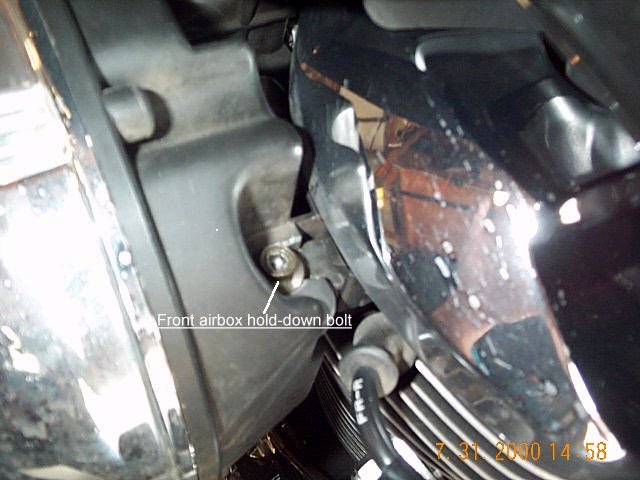
On the back side of the airbox on the front and rear, (looking down from the tank) you will see two bolts with allen sockets in them. Use the other allen in your kit to remove these, or a ratchet with a 10 mm socket. The heads are about 1/2". You can't miss them.
|
|
|
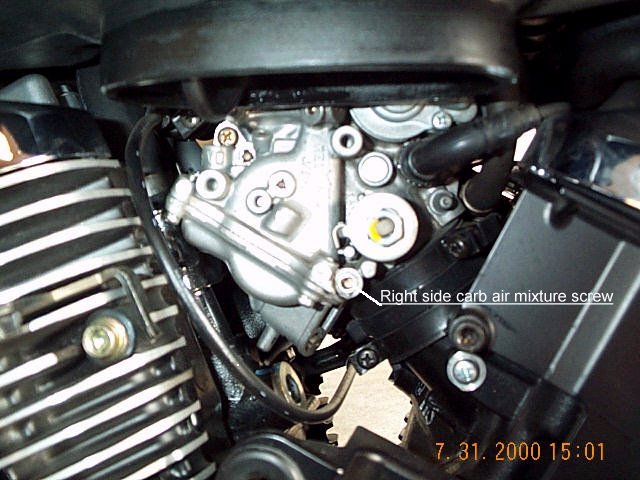
Now you can see the plug over the right side air mixture screw in the same place as on the left side.
|
 |
|
According to the Honda Service Manual, the factory setting for these screws is 2 1/4 turns open. These screws adjust the amount of fuel that the pilot jets (idle jets) squirt into the carbs. Carefully screw each one in until it lightly seats closed, and count the number of turns. This will tell you the number of turns each was open and give you a new starting point for adjustment. Now carefully screw out (open) each one to 3 1/4 turns open (1 full turn beyond the factory setting). If you're picky, like me, take each plug you removed and drill the hole just large enough for the tip of your little tiny screwdriver to get through, then reinsert the plugs. Or, you can stick a little dab of silicone sealant in each hole. It sets up, hold the screw, and comes out easy if you want to "fiddle" later on. That's all there is to it! It's actually pretty simple, just need someone to tell you where stuff is. And pictures are always helpful. If you have any more questions about this, just let me know.
|
|
|
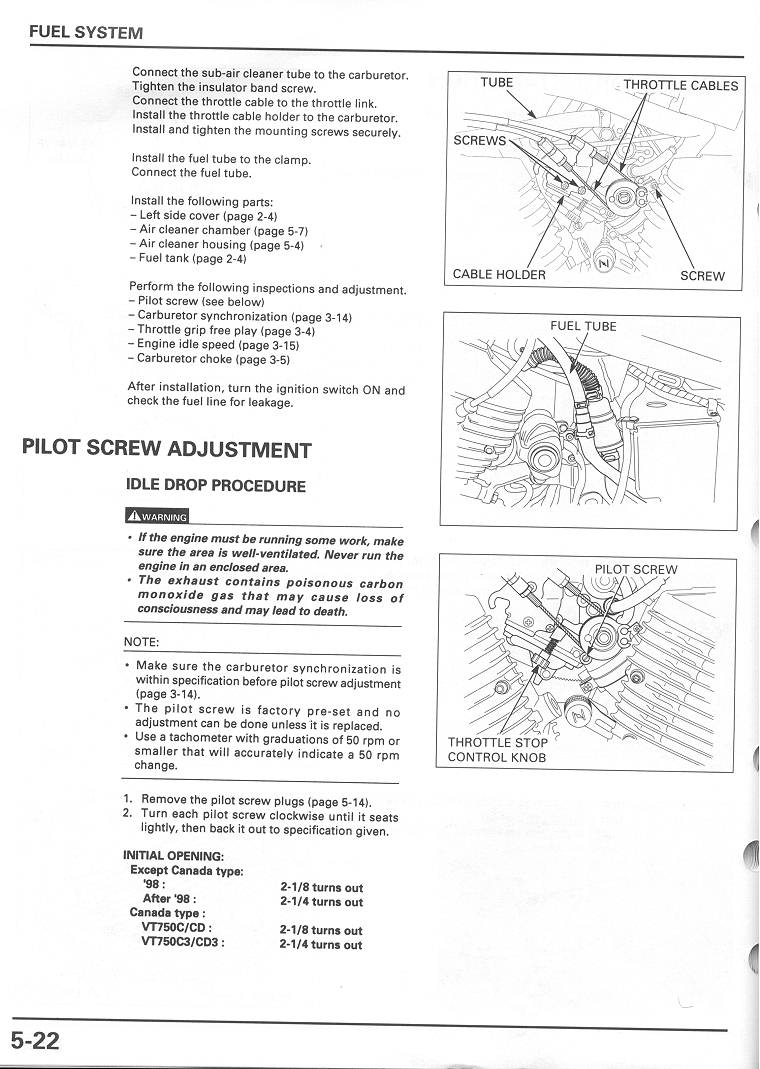
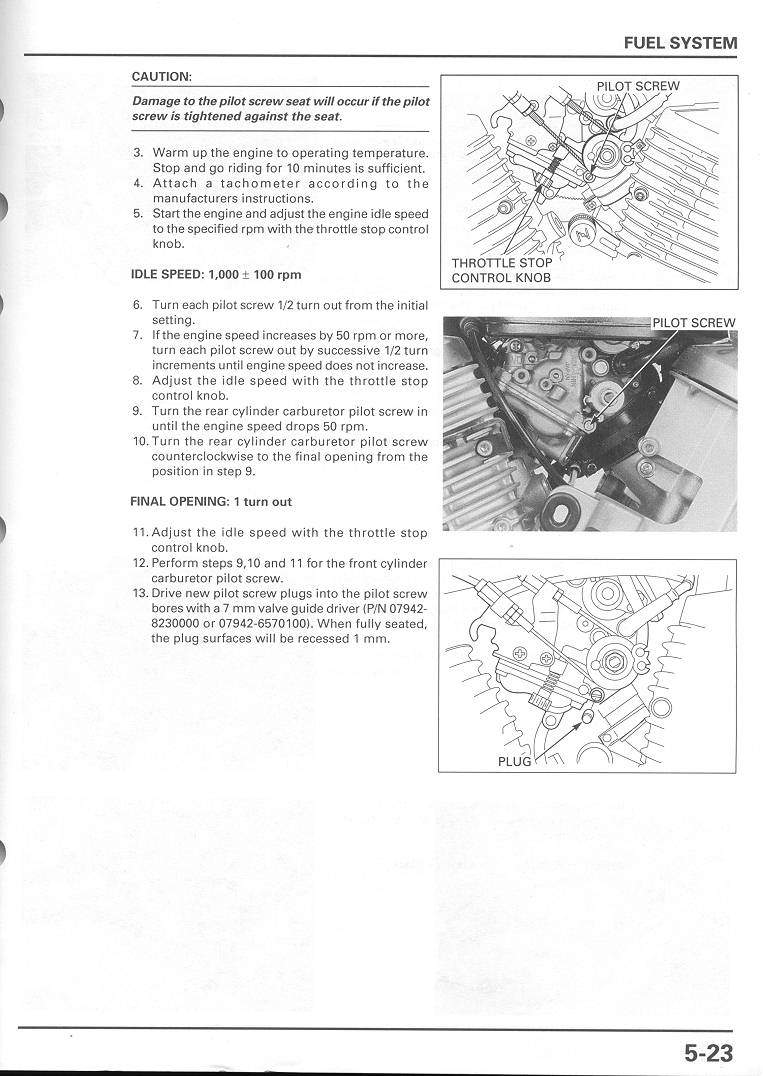
Scans from the Service Manual covering the mixture screw adjustment.
|
|
|
Exhaust Mods & Mixture Screws Update Parts 1 & 2:
It's been a while since I did the stock exhaust mods and the mixture screw thingy, and have now had time for plenty of feedback from the many people who have done them. I have learned a few things about the ACE 750 that I would like to update everyone with. First, it is apparent that not all the 750's come from the factory with the mixture screws turned out to 2 1/4 turns open as the Service Manual indicates they should be. This would seem to be right in line with many owners reporting popping on decel when the bike is right off the showroom floor! Some have even found one of them closed entirely! For this reason I would encourage EVERYONE who has not done so, to pull the caps on their mixture screws and adjust them. A proper adjustment would be done with a tachometer fitted to the bike to monitor idle rpm as per the Service Manual, but here's a quick and dirty way that works. Follow the beginning of the procedure – pull the caps and carefully close the screws until they lightly seat, counting the number of turns in (clockwise) until they lightly seat. This will tell you how far open they are to start with. Next, open them to 2 1/4 turns open. Now start the bike and let it idle. If the bike has not been previously warmed up, let it idle until it is warmed up. Once the engine is warmed up, start with the left mixture screw (rear cylinder) and slowly turn it closed until the rpm's drop and the idle begins to falter. It will do this because that cylinder is now running too lean. Now, slowly open the screw until the idle smoothes back out. This can be as much as 1 full turn. Stop the engine. Turn the screw back in to lightly seat it, counting the number of turns until it does so. This will tell you what your base opening will be. Now open it back up to the number of turns you just counted. Repeat this procedure with the right side mixture screw (front cylinder). Reinstall the air box and take it for a spin. If you can find a decent downhill grade, get up some speed then let off the gas and let it decel hard. You are looking for whether it is going to pop on decel or not. Not just an occasional pop (that's normal), but that machine gun "firecracker" type popping that started us doing this in the first place! Also note it's general running condition, such as a hesitation when you crack the throttle. If you have a good popping going, especially combined with a hesitation on opening the throttle, return to your "shop" and give each screw an additional 1/4 turn open. Repeat the above until it treats you right. The 3 1/4 or 3 1/2 turns open my site indicates is a good starting point that I found through much trial and error. But other conditions may affect this. Your altitude, for one. Following the procedure above will take into account any other conditions that exist. I have said that some popping is normal. This is true. SOME popping and an occasional backfire is normal. When it snaps, crackles, and pops, and backfires, don't let your dealer or his mechanic tell you that THAT is normal. What they are really telling you is that they either don't know how to, or don't want to, fix it. All that popping and such is an indication of a too-lean running condition, and it CAN be fixed! There are many points throughout the Exhaust Mod that you can get popping on decel when you had none before. MINE happened at one certain stage, but yours could happen anywhere along the line. When it does, it is time to adjust the mixture screws. Adjusting the IDLE screw so that the bike idles faster is not a solution to this, you MUST open the mixture screws. Some have expressed concerns about damaging the bike by punching the baffles or adjusting the mixture screws. Don't worry, you are not going to harm the engine by allowing to it exhaust more air or by giving it more fuel. You also will not void your bikes warranty by punching and drilling the exhaust. You'll only void the warranty on the exhaust. Adjusting the screws will not void the warranty. Should something happen to your engine (and it will be unrelated to these), Honda must prove that your modification somehow caused the damage. That is why I cannot guarantee your success. The mods and the adjustments will work, but I cannot guarantee HOW any individual person will go about doing them. If you follow the procedures exactly as I outline, you will have no problems. Some have asked about replacing the plugs on the mixture screws. In theory, it is not necessary. However, I have heard reports of people adjusting their mixture screws, and having them subsequently fall out. That is why I recommend putting the plugs back in place. I drilled mine out to accept the blade of my "adjustment" screwdriver and put them back. This allows me to make adjustments to the screws at a later time, and should they work loose, the plug will keep them from falling out. Another method is to place a small dab of silicone sealant or caulk in the hole on top of the screws. This will hold them in place and is easily removed later. Although all jetting instructions, and the Honda Service Manual indicate you should drill the mixture screw plugs to insert a screw to remove them, it's not strictly necessary. You CAN just drill out the entire face of the plug to accommodate a small screwdriver blade. In any case, when drilling the plugs go slow, take it easy, and be very careful not to drill too deeply. You do not want to hit the screws with the tip of the drill bit. The screws are only about 1/4" to 3/8" behind the face of the plugs. In response to an email about punching the stock exhaust, the mixture screws, and valve adjustments, here are some more thoughts and observations. Punching a few holes in the stock exhaust has been around for ages. Aside from the fact that the stock exhaust is SO baffled and restrictive (read: backpressure) that punching a few holes in it is not going to open it up so much as to adversely affect the engine, you are not even going to come CLOSE to opening it up the way an aftermarket exhaust would, and there have been ZERO reports from ANYONE who has punched the exhausts on any of the Shadow line regarding engine damage over time. The real trick to opening the exhaust in ANY way (punching holes in the stock exhaust or adding aftermarket) is to re-balance the air/fuel mixture. That's why part of punching the exhaust includes adjusting the idle air mixture screws to add more fuel to match to added air you are passing through the engine. The idle circuit, or the slow jets, primarily affect the fuel delivery up to about 1/3 throttle. The needle configuration and needle clip setting come in after that, the your main jets take over for 3/4 to full throttle. There is an overlap of all of these items in how they affect fuel delivery. When adding an aftermarket exhaust, it is wise (and advisable) to rejet the carbs to increase the fuel delivery to match the much larger amount of air. The punching of the stock exhaust does not require this as the adjustment to the idle mixture screws is sufficient to ensure that the engine does not run too lean (too much air, not enough fuel). Running too lean WILL cause damage in the long term. Backpressure is not entirely necessary for the engine to run well, but it does affect power over the different ranges of the powerband. I'm sure you have heard of "drag pipes". Drags are basically straight pipes with no baffles. The only backpressure they create is just from the resistance to the movement of the exhaust through any bends in the pipes and friction against the inner wall of the pipes. Drag pipes are called that for a reason. They are used for drag racing where the major power is needed in the low end of the powerband – getting off the line FAST and running for a short distance at top power and top speed. The lack of backpressure reduces power and efficiency in the middle and top end, but does not harm to the engine if the jetting is correct to balance air and fuel throughout the powerband. It's somewhat complicated and I don't understand all of the details, but some backpressure is need to keep the powerband smooth and powerful throughout it's entire range. The baffles in our pipes do this. Valves being out of adjustment can cause the bike to run poorly in many ways, popping and backfires being one symptom. However, the consensus amongst the dealers and their mechanics that we have gathered in the forum indicates that very few even CONSIDER touching the valves during the 600 as most say they have rarely seen a 750 that needs the valves adjusted on the 600. They listen to the engine for anything indicative of a misadjustment in the valves, and they ride it and look for the same. In most cases they do not need adjusting. It just turns out that most dealers don't adjust the valves until around 8000 miles. I had mine done at 10,500 because I had noticed a general degradation in performance and how the bike ran, and idled, that told me the valves were ready. And they were. Much better after they were adjusted. If you read my update page, one of the thing that should stand out is the part about the mixture screws and people reporting this popping on decel right off the showroom floor! They have eventually pulled the plugs on the mix screws and adjusted them and the popping went away. They have found them set to all kinds of different openings from the factory. Some have even found one of them fully closed! No wonder the thing pops like a jiffy pop! My guess is that you simply need to adjust your mixture screws and all will be well. I would suggest you wait until you have had the 600 done before you do any of this. Let them do their thing, but be sure you ask EXACTLY what they PLAN to do for your service, and what they DID do when you get it back. Then you can punch away and make your own adjustments to the mixture screws to put everything right. If they REALLY adjust your valves they're gonna hit you for a chunk o' change. It's a 2 hour job and the bike must be left for a couple of days as the engine must be cold when the valves are adjusted. You probably don't need them adjusted, but there is a slight chance that you have one that got out of the factory out of tolerance and they DO need adjusting. But if the bike runs fine and just has some popping on decel, the valves are most likely not the culprit. The mixture screws are. Steve |
|