|
California Emissions Removal |
Info provided by Forum member Rob "Hollywood" Low
|
This page is for illustration purposes only. The sponsors, owners, publishers and authors of this website do not advocate the removal of emission control systems, or in any way condone removing an emission. system Do not attempt to bypass or remove any equipment required by Local, State, or Federal law. |
|
|
My bike is a 1998 Honda Shadow ACE, California edition. How it ended up in Indiana, I have no idea. After re-jetting several times, I finally got tired of hooking up the dozen or so extra hoses associated with the California model, so I decided to remove it. The illustration at the right shows what we eventually want to eventually want to end up with. Begin by removing the seat, the tank (be sure to turn off your petcock) and the side covers. An opportune time to do this mod is when you are re-jetting.
|
 |
|
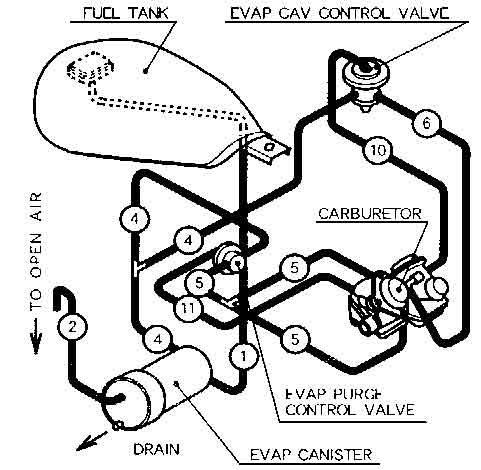
This is the diagram of the California Emissions system. The only hoses that will remain untouched is hose number 1, and the hoses numbered 5. Hose #1 is your tank vent. Every other item here can be removed, but do not discard it. You may need some of it to make vacuum caps. The numbers you see on this diagram are actually printed on the hoses themselves. The previous illustration shows 3 hoses that are labeled "Air Tubes". On this illustration, they are hoses numbered "5". There is no need to remove the hoses numbered 5 from that connect the carbs and join in a "T". You will find in your pile of removed hoses, you will find a hose bent in the shape of an "S" (see previous illustration) This will go on the "T" that connects hoses # 5 on the carbs. I have labeled this "TO OPEN AIR" on the illustration above. This "S" hose will dangle between the cylinders upon re-assembly.
|
 |
|
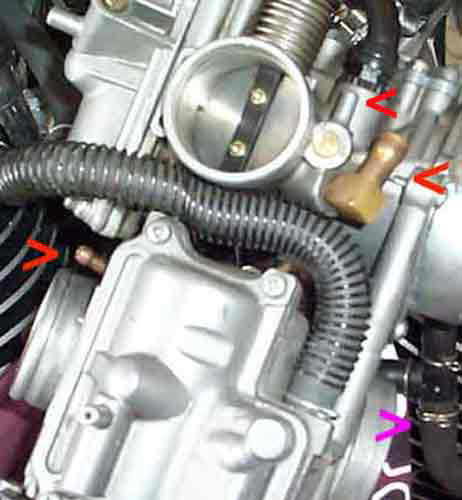
This photo shows where the hoses labeled #5 connect to the carb, and the red arrow is pointing to them. The yellow arrow shows the "S" curved open air hose. Note the big black fitting pointing up on the left side of this photo. This is to the sub air-cleaner element, and there is one on each carb. |
|
|
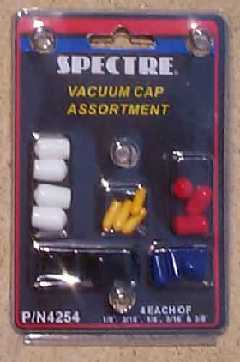
This photo shows 3 of the vacuum ports that need to be plugged (red arrows). You can get vacuum caps at any auto parts store, or you can make your own by putting a screw in a hose and using that as a cap. I chose to use the vacuum caps. I used 1 blue, one yellow and 2 white. The white on goes on the brass fitting, and there is an identical fitting on the other side of the carb. Note: the blue came off, and I found using a homemade cap worked better on that one. The pink arrow again shows the air tubes described in the first illustration.
|
|
|
This picture shows 3 of the 4 places that need to be capped. Again, on the opposite side there is an identical brass fitting that requires a white vacuum cap like the one shown here. Put it back together! Don't forget to attach the sub air cleaner hoses as shown in the first illustration.
|
|
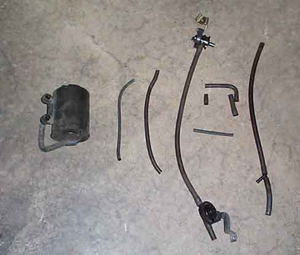
| And throw this crap away! Or put in a box, in case you ever move to California! |
 |